| Tutorials - Making Combined Poses |
 |

|
Making Combined-Poses is a little bit harder than making normal poses, so I'll try to explain it using a very hard pose...
I recommend you start first by making poses from an image or
a screendump from a movie... It is easier because you can
concentrate on the pose and not on what you have in your mind :o):
|
|
|

|
|
|
|
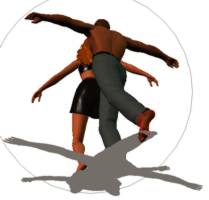
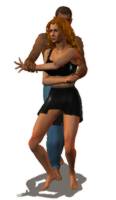
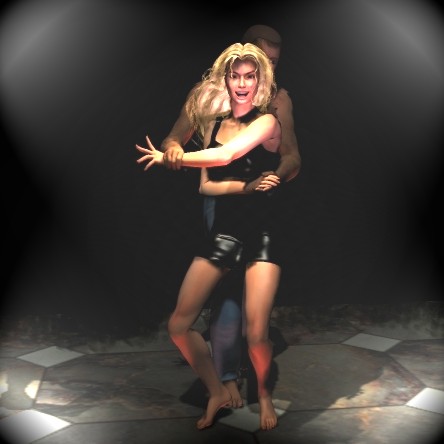
Let's have a look at this image:
As you can see these two are icedancers (btw: they are Elena Grushina & Ruslan Goncharow). I will make a normal dancing pose out of this. Don't pay too much attention to their feet. The harder part would be the girl because the boy is only holding her and of course the hands of both figures.
Another thing: Don't concentrate on their clothes (Liz Pope or Rena would do so - lol), we are making a pose here...
|
|
|
|
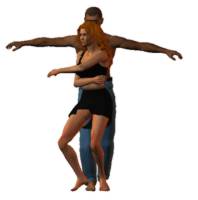
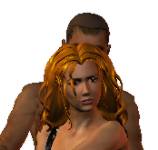
1. setting the working place
We need a woman: an additional man:
and some clothing. After I applied her hair I switched off IK for both of them and placed the man behind her
by moving his Hip in the z-axis (-0.1 - use the dial). Never move a body when making combined-poses. Then, I applied the rest of the clothes... and
switched over to normal "Textured" view (I normally start in this view but here I used the comic view just
because minors may be reading this tutorial.)
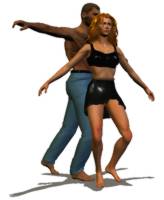
Now your image could look like this:
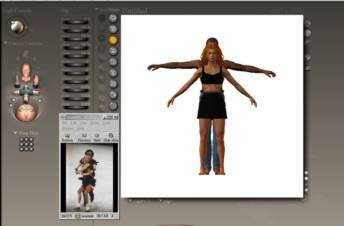
As you can see, I arranged my tools a little differently then the standard and I put my ACD-See
always on top (so I could compare between reality and virtuality). Make sure you have disabled
-use limits-.
|
|
|
|
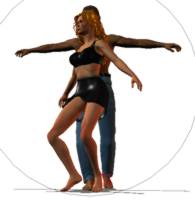
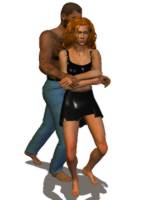
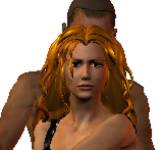
2. The Hips
The hips are the most important thing when making combined poses because when you move the hip of a figure
the whole body will move too. If you have to move your hip later on, chances are that you'll have to correct the rest of
this figure (and the other figures) also. So make sure the hip is placed correctly. After that, move the abdomen,
chest and the thighs to give them a balanced stance. As you see our example model is not balanced because
"she" is leaning a little bit on "him". I switched to a side-view to see if my z-axis-value for "him" was
correct and decided to move "him" a little bit closer to "her" (Hip = -0.09). Normally, I choose the rotate and
the twist tools to arrange the body-parts. When it comes to a more detailed tweak I choose the dials. For the
ankles that don't rotate, like the shins and fingers, I use only the dials.
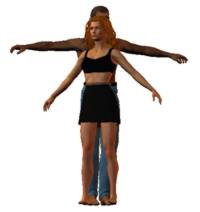
I concentrated mainly here on the parts of their body that will hit the ground (everything under their
hips in this case) and tried to make them ready for -applying to the ground-. |
|
|
|
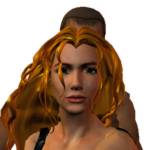
3. Fine Tweaking (Dropping-on-the-floor)
Now I fired -Drop to floor- (be sure to activate the character - not it's clothes) and normally I find out that
I have to redo the body-tweakings :o). I switched to the main-camera to make sure both of the
feet are on the ground. For this I have to rotate the camera-angle a lot to have a round-view over the scene.
If you look from "under the ground" you can easily see if something is "underground" and therefore must be
corrected.
|
|
|
|
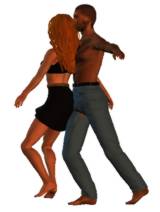
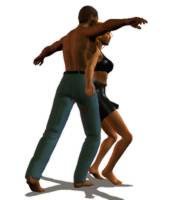
4. Finetweaking (Arms)
Now they are standing and I can concentrate on other things.
First I make sure their bodies are not overlapping. Then go to the arms. These are a little more difficult because I
have to pay attention to the limits. The shoulder is not so important but take care of the collar
and the forearm. If something bad happens, use the undo-button. If something very bad happens apply
the left arm to the right arm or vice-versa.
As you see I don't care about much about the hands because I know I have to tweak them anyway later, so
I concentrate on the arms now.
|
|
|
|
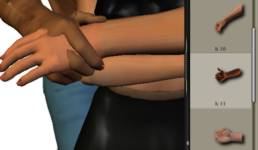
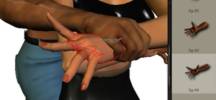
5. Fine Tweaking (Hands)
The hands are a hard part in this pose, so I first applied the hand-camera to have a workable
view...
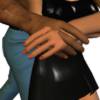
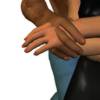
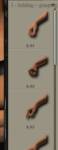
Then I imagine "him". In this case, he must hold her, so I first try my luck at my hand database
(in the holding and grasping area):
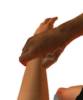
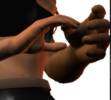
However, a hand-pose never fits perfectly, so I have to tweak the fingers anyway. I could only match it a little by using a hand-pose from the database. For the woman (at her left hand here) this is easier. I can choose a spreading hand-pose
because she is not grasping with her left hand:
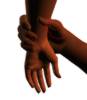
Try to switch your pov (point of view) often... to match the body parts.
OK, the same work must be done
to the other two hands:
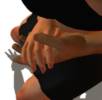
Now we're a little bit closer to our desired pose ...
 |
|
|
|
6. Rough Tweaking (Head and Hair)
Now to the funny part. If you want the girl looking at you (she is the active part in this pose
so it is just normal she will look at you) move her neck to look at you and then move it a little
bit more so she looks beside you and then move the head back.
The hair: Just move part 2 of the hair in one and part 3 of the hair in the other direction and distort
the strands a little bit.
Note: If you want to rebuild the image, then you would not do this. I advise you to move the neck more
than the head, it simply looks better. Normally I don't rebuild images. I only use them to have an
idea of a pose.
When your pose is finished it needs to have some lights and atmosphere.
|
|
|
|
7. The Image
...could now look like this (after a little postwork - but there are many many better artists around
to explain this than I can do):
You can have a look at the whole *.pz3-scene (with stripped textures and only P4-clothing)
at the scenes-section on this CD.
|